Professional Ship Simulator Controls
Fifty-plus binds, nine axes, and a clickable bridge — here is how to live with them.
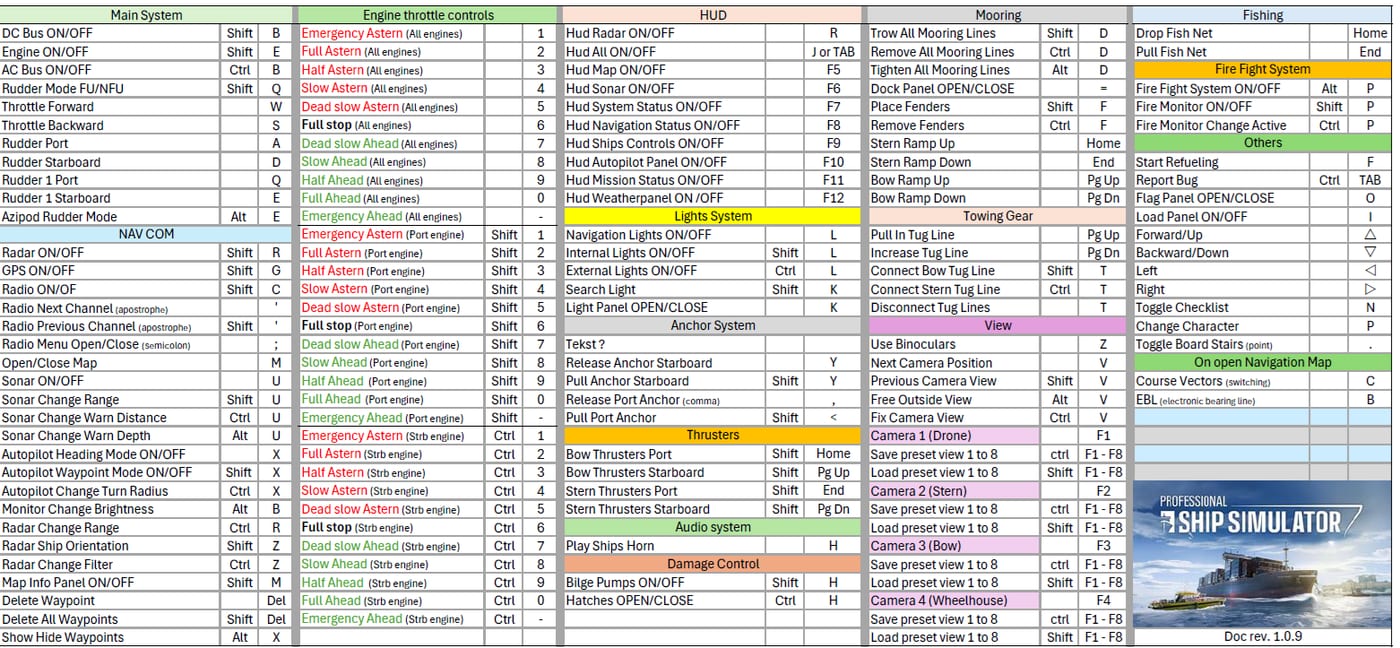
Professional Ship Simulator is built for people who own joysticks, throttles, and the patience to map them. Official copy cites more than fifty buttons, nine axes, and a triple-layer keyboard, plus a fully clickable cockpit. That density is the point of the sim and the usual source of first-hour rage. This page explains the layers. The keyboard and gamepad tool page is the printable cheat sheet.
If you have not completed a cold start yet, read getting started first. Binds do nothing while batteries are dead. How to play covers autopilot keys in context.
Keyboard layers and the checklist
Think of the keyboard as three stacked shift states rather than a single WASD scheme. One layer is everyday helm and camera. Another is systems (power, lights, pumps, radio). The third is specialised gear: winches, cranes, fishing gear, fire monitors. The exact glyphs live on the official US keybind graphic (version 0.9 as published on nauticxp.com in September 2026). We host a local copy on the keyboard page so you are not hunting a forum PNG mid-berthing.
Open the in-game checklist panel whenever you forget a bind. Page one lists mapped keys by category. That panel is faster than alt-tabbing, and it is how the official tutorial tells you to recover. Demo streamers also mention N as a “show me the keys” helper. Keep whichever overlay you prefer, but do not try to memorise fifty commands before your first undock.
Practical defaults you will use constantly:
- Arrow keys or gamepad hat: nudge the current camera.
- Cycle camera locations: bow, stern, wings, funnel, external orbit.
- M: chart / map.
- Autopilot engage (often X on default, rebind if it collides with your camera): heading hold or route.
- Shift-modified view keys (creators mention Shift+V style swaps) to jump between stored angles.
- Mouse: clickable panels, HUD thruster tiles, radar, and radio.
Rebind early. A triple-layer layout that was comfortable for the developer’s German keyboard may not match your muscle memory. Per-ship controller profiles are supported — a tug on dual sticks should not share a cruise ship’s throttle quadrant.
Gamepad, sticks, and hardware
Steam lists partial controller support. Aerosoft published a first-pass gamepad layout on the official download page; use it as a starting map, not as aviation-grade documentation. Typical pattern: left stick for helm/camera depending on mode, triggers or a second axis for throttle, bumpers for thruster nudge, and a “special” modifier (the tutorial’s “special left”) to reach the HUD system grid. Face buttons confirm thruster direction once the HUD tile is highlighted.
If you own a ship-sim console, USB throttle, or a yoke you insist on using, map analogue axes first: wheel, throttle, bow thruster, stern thruster, maybe look. Buttons come second. Nine advertised axes exist because real workboats live on analogue nudges, not digital taps. Deadzones should be small; bank effect already adds delay, and a sticky stick makes it worse.
Mouse remains mandatory for radio, cargo sliders, and some panel work even if helm is on a wheel. Plan a surface for the mouse next to the throttle. Clickable cockpits are dense on merchant bridges; sit close enough to read labels.
Cameras, thrusters, and docking binds
Store a bow camera and a stern camera on every ship you care about. The tutorial notes that the last camera position is remembered. On a container ship that memory is the difference between clipping a dolphin and catching it. Unlock heading-follow when you need to look at a quay; lock it again on passage so the horizon stays sane.
Bow and stern thrusters are HUD-clickable. Right-click (or the gamepad face-up confirm) sets direction. For a lateral walk, set both thrusters the same way. For a spin, set them opposite. Combine with tiny ahead/astern and rudder; thrusters alone on a loaded tanker in wind will disappoint you. Line and winch controls show up once you start docking. Do not search for an “auto moor” key — tension is simulated, and lines can part.
Anchor controls support the slow, correct way to stop a ship that still has way on. Bind anchor to something you can hit without looking. Bind binoculars near camera cycle. Bind radio near the map key so you can accept a mission without leaving the chart.
When the layout still feels hostile, drop back to a beginner ship with fewer systems. A pilot boat is a better classroom than an LNG tanker. After you can undock on muscle memory, copy the binds to larger classes and only add the extra layers those hulls need. Check the updates hub if a beta build reshuffles defaults — the team has been iterating input through public demos.
Frequently Asked Questions
Quick answers before you take the helm.
Where is the official keyboard overview?
On the nauticxp.com downloads page. This wiki keeps a local copy on the keyboard tool page.
Can I play entirely on a gamepad?
Helm and cameras, yes, with patience. Radio, cargo, and some panels still want a mouse.
Why do my keys do nothing?
Power is off, you are on the wrong keyboard layer, or the bind belongs to another ship profile.
Should I use the clickable cockpit or the HUD?
Use both. HUD is faster under stress; the 3D panel is clearer for cold starts and radio.